Planning a paver patio or fire-pit patio that stays level
A patio that looks great in year one and still looks great in year ten is mostly a story about what's underneath it.
October 8, 2026 · 4 min read
Start with how you'll use it
Before you pick a paver, decide what the patio is for. A table for six needs a different footprint than two chairs by a fire. Set out your real furniture, or cardboard boxes the same size, and live with the layout for a weekend. Leave room to push a chair back from the table without a leg dropping off the edge. Think about how people walk to the patio from the door and where grill smoke will blow when the afternoon wind picks up.
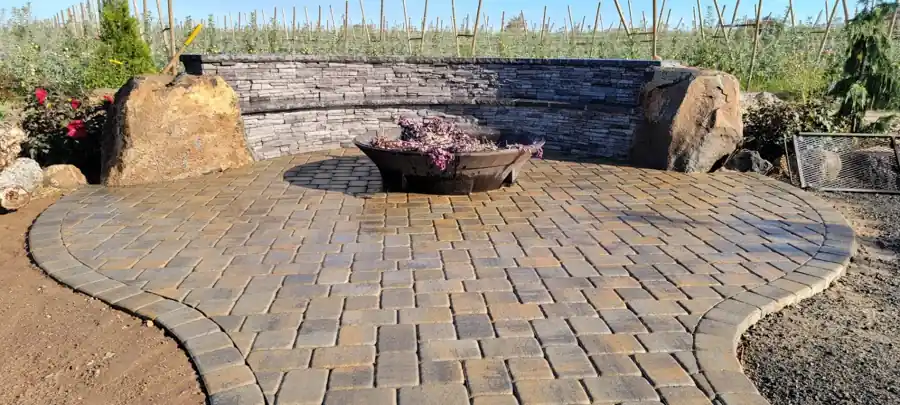
Fire pits need extra thought. Keep them well clear of the house, fences, overhanging branches and anything that burns, and check local burn rules and summer fire restrictions before you ever light one. A round patio with a seat wall around the pit works well because the wall doubles as seating and keeps everyone facing each other instead of lining up in a row.
The base does the real work
Pavers don't fail from the top. They fail from underneath. A patio is only as flat as the base beneath it, and the base is mostly excavation, crushed rock and compaction. The crew digs out topsoil and soft ground, then builds up layers of crushed aggregate, compacting each layer with a plate compactor before the next goes on. Skip that, or compact one thick pass, and voids settle into dips after the first wet spring.
On top of the compacted base goes a thin, screeded bedding layer, usually sand, that the pavers sit in. That layer is for leveling only. It isn't meant to carry load, and piling it thick to hide a poor base is a classic shortcut. If your yard has clay or soft fill, the base needs more attention, not less. Ask any installer how they handle the ground under the patio, because that answer tells you more than the paver brochure does.
Edge restraint keeps the shape
Pavers want to creep outward under foot traffic, furniture and freeze-thaw cycles. Edge restraint stops that. It can be a concrete or paver border set on its own footing, a buried plastic or metal restraint spiked into the base, or a seat wall that locks the patio in on one side. Without it, the outer rows spread, joints open up, and the patio slowly loses its crisp outline within a few seasons.
Border bands are the good-looking version of the same idea. A darker or contrasting row of pavers around the perimeter frames the field, hides cut edges where the pattern meets a curve, and gives you a clean line against lawn or rock. A charcoal border around a lighter field is a classic combination, and it's easy to keep clean.
Seat walls and steps
A seat wall around a fire-pit patio is one of the best features you can add. Set at a comfortable sitting height, it gives people a place to perch and defines the patio edge. The wall needs its own footing and base course, just like the patio, and it should be built so it doesn't push on the pavers or settle away from them. Stacked stone, segmental block and poured concrete all work, and the choice mostly comes down to the look of your house.
If the patio sits above the yard, plan steps early. Even riser heights matter more than most people expect, because an uneven step is where someone trips. Let the installer lay steps out before you fall in love with a patio shape that fights the grade.
Drainage and slope
A patio should never be perfectly flat. A slight slope away from the house, roughly a quarter inch per foot as a common rule of thumb, sends rain and snowmelt toward the yard instead of toward your foundation. Plan where the water goes after it leaves the pavers: a lawn, a gravel bed or a drain. Water that pools at the edge undermines the base, and ice on a shaded patio is a hazard you can design out in advance.
Hillside lots add another layer. If the patio sits against a slope, water coming downhill needs a path around or under the patio, and often a retaining wall behind it. That's where planning the patio and the wall as one project pays off.
A checklist before you approve a design
- Furniture and fire pit laid out on the ground in chalk or cardboard before the layout is final.
- Base depth and compaction method explained to you in plain language.
- Edge restraint named for every side of the patio, including the sides that meet lawn.
- Slope direction marked, and a clear answer for where the water ends up.
- Joint material and how it will be maintained as the seasons change.
- Locations of utilities, sprinkler lines and lighting wire, so nothing gets buried in the wrong place.
Working with a crew that builds the whole picture
OMG Landscaping & Design installs pavers, patios, walls and sprinklers across the Yakima Valley. Customer Susan Saunders wrote that Marco has handled pavers and a fire pit area among the many projects she's called him back for. A crew that builds the patio, the walls and the irrigation can sequence the work so nothing gets dug up twice.
Thinking about a patio or fire-pit area? Call (509) 307-8268 or use the contact page, and bring your furniture list.
OMG Landscaping & Design LLC, (509) 307-8268
Call (509) 307-8268More articles
Concrete landscape curbing: what to decide before the pour
A poured curb is one of the few yard upgrades that makes weekly chores easier, but only if the layout suits your mower.
Retaining walls for hillside yards: base, drainage, block
A retaining wall is a soil and water problem first and a design choice second, and the order matters.